![[KDLP] logo](https://kdlp.underground.software/images/kdlp_logo.png)
Kernel Development Learning Pipeline
How to set up your VM and Linux environment
Start downloading the standard ISO image for Fedora for your architecture (most likely it would be x86_64, unless you have an M1 Mac or you are running Linux on ARM in which case you want the aarch64 ISO): https://getfedora.org/en/server/download/. This may take a while, depending on your connection, so get this started first.
Get the appropriate software
- Windows - VirtualBox:
- Click the download link for Windows hosts.
- MacOS - UTM:
- You don’t need to buy it from the Apple Store for $10, there is a free download that is identical (press the download button at the above link).
- Linux - virt-manager:
- You can most likely get it from your system’s package manager.
- Depending on how powerful your machine is, you can give it more or less.
- Generally, leave at least half of the cores and RAM for your host system.
- The more you can give the Vm the better.
- For the class you would need at least 25-30G of hard-disk space to hold the VM.
- Balance it how you want. Feel free to reach out for specific advice, depending on the specs of your machine.
Set up the VM
- Once the ISO image has finished downloading, you can begin the VM set-up process.
- Depending on the software you downloaded, the exact procedure will vary. But you want to create a new machine with the recourses you decided to allocate and you most likely just follow the set-up wizard of your software. Make sure to create a virtual hard drive for the machine (at least 25G is suggested).
- Attach the ISO image to the machine, this will allow it to boot into the Fedora installer.
- Start the VM for the first time and boot into the Fedora image.
Install Fedora to your virtual machine
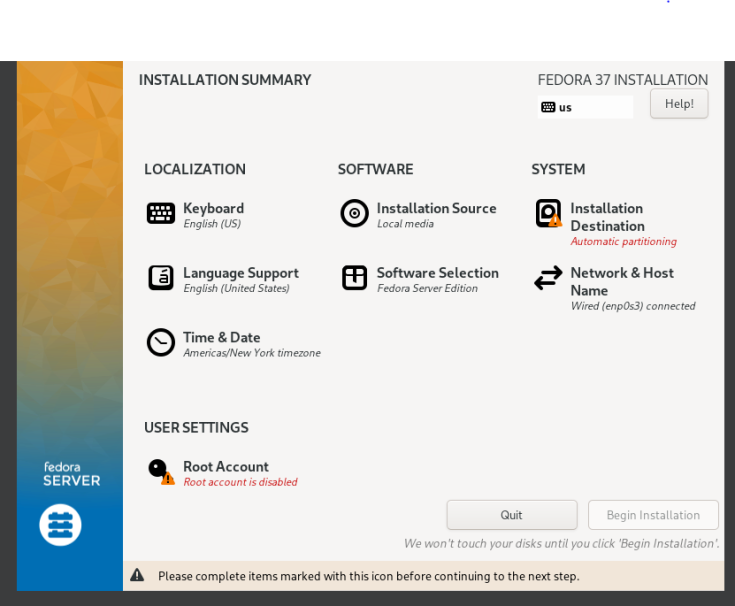
- Mostly follow the on-screen instructions, but there are some confusing steps. There are numerous tutorials online on how to proceed based on the VM you are using.
- This particular step, depicted below, might be especially confusing. Just click on “Installation Destination” and click “Done”, you don’t need to change anything you just need to confirm what was already selected by default.

</img>
Optional steps
- Run a software update:
- Login with your root account.
- Run the command
dnf update, this may take a while to complete.
- While you are waiting you can switch to a different console and continue following the steps.
- Press
ctrl+alt+f2 (on some keyboards you might need a function key to press f2).
- You can check back on the update any time by pressing
ctrl+alt+f1.
- Create yourself a non-root account with sudo permissions.
- Login as root.
- Pick a username for your account.
- Run the command
useradd username where username is the username you picked.
- Run the command
usermod -aG wheel username to give the new user sudo permissions.
- Run
passwd username and select a password.
- Log out of root (type
exit or hit ctrl+d).
- Try logging in as your new user with the username and password you selected.
- Verify that you have root access via
sudo echo hello, you should be prompted for a password and when you enter your password the echo command should execute.
- Set up SSH access:
- Run the command
ip -br a | grep UP, read the ip address listed there.
- On your host machine, open a terminal and try running
ssh username@ip-address where username is the username you picked earlier and the ip-address is the one you just found.
- You should be prompted for your password, after you enter it you will be able to access your vm from your host machine.
- If you want to obviate the need to enter the password every time you log in, you can set up SSH-keys.
- If you have never set up SSH-keys:
- Run the command
ssh-keygen in a terminal on your host machine and accept the default values.
- If you already have SSH-keys or you just created them using the step above:
- If you are not on Windows, run
ssh-copy-id username@ip-address to copy your keys to the VM.
- If you are on Windows, run
type $env:USERPROFILE\.ssh\id_rsa.pub | ssh username@ip-address "cat >> .ssh/authorized_keys"
- You will be prompted for your password, enter it, and the command should finish.
- Try logging in with
ssh username@ip-address and you should not need to enter your password again.
- Make the VM headless:
- Check back on the updates from the first step. Wait for them to finish.
- Once the updates are finished, run
shutdown now. The VM should shut down and exit.
- Open the VM Settings and disable the graphics, the exact settings depends on the VM software you are using.
- Most of the time you will be able to keep the graphics off, since you already set up SSH access.
- This will lighten the load on your computer since it won’t have to render the GUI and will make the VM run faster.
![[KDLP] logo](https://kdlp.underground.software/images/kdlp_logo.png)
![[KDLP] logo](https://kdlp.underground.software/images/kdlp_logo.png)
 </img>